

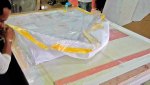
Finished undertray after painting rests in the mold for curing
Building the undertray started with building a surface large enough to hold it. It’s larger than it looks, so we had to laminate decorative plastic laminate onto two 4×8 foot sheets of plywood that had been trimmed to about 3×8 feet each. Then wood to form the side air dams was screwed down, and the radii filled with auto body putty. Next we cut plastic honeycomb and plywood pieces to fit, with the plywood located to pick up the attachment points on the frame and to protect the radiators on either side of the car. I built a hot-wire foam cutter from a tree saw handle, a piece of guitar wire, and an automobile battery charger, which I used to cut foam profiles for the leading edge of the floor. Then we laid the whole thing up with epoxy and two layers of fiberglass on the bottom and one on the top, and vacuum bagged the whole shebang. Vacuum bagging was made more difficult by the random tiny holes in the plastic sheeting, which we expediently fixed by adding a whole second sheet on top of the first.
After debagging we painted it and found out the hard way that you can’t paint enamel over fresh epoxy in a humid climate. It never dried, and had to be scraped off like tar. Epoxy paint worked much better. We then mounted the undertray on the car, drilling mounting points through the plywood in the correct places. We had to fabricate a mount for the front of the undertray, which was a little tricky as we didn’t want to remove the fiberglass body panel under the driver’s legs so everything had to be done from the outside. We fabricated a small pylon from aluminum sheet and pop-riveted and epoxied it to the bottom of the body.
-

- Glue-laminating table surface
-

- Big flat smooth area to build the undertray on
-

- Template to transfer the car’s floor shape to the undertray
-

- Test fitting the sidepods
-

- Cutting an airfoil template on the bandsaw
-

- Using a belt sander to finish the aluminum airfoil profiles
-

- Cutting a foam airfoil with new hot-wire cutter
-

- Pretty slick, eh?
-

- Cutting the plywood core strips to size
-

- Overview of the various side dams
-

- Side air dams for the tea tray
-

- Close up of the right front leading edge and side dam molds
-

- Mold waxed and ready for layup
-

- Laying up the floor: inserting plywood core
-

- Spreading out the perf ply
-

- Applying the breather cloth
-

- Applying the vacuum bag
-

- Undertray curing under vacuum
-
- Removing the vacuum-bagging layers
-

- Fresh out of the mold
-

- Scraping off the enamel that won’t cure over epoxy
-

- Front support formed of aluminum sheet riveted and epoxied to body
-

- Finished undertray in place on the car
