
-

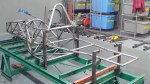
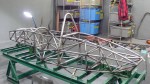
- Removed the chassis from the jigs for the first time. Welded the bottoms of all the joints, which brought the chassis back to true & flat
-

- It’s a commuter car! You can carry it like a briefcase.
-

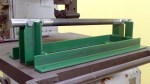
- Test fitting the rear beltline tubes. Chassis table has pins to locate these tubes, too.
-

- Rear subframe beltline welded…
-
- And into place.
-

- First parts back from the machinists’. Rear keel jig and the keel itself. Beautiful and accurate! Thanks, Somkuan!
-

- Rear keel, ready for welding.
-

- …and welded.
-

- Welded rear keel jig. Really starting to get the hang of this welding stuff. Yay!
-

- Bottom perimeter of the engine compartment fabbed and welded.
-
- Finished rear keel and rear keel jig.
-
- Engine compartment left side lower tubes
-

- Engine compartment right lower diagonal
-

- Bulkhead H right vertical lower tube
-

- Another example of how my Solidworks fishmouthed tubes fit, this one at the front end of the rear keel.
-

- Lower diagonal tubes holding the front of the rear keel.
-
- H-J inner upper diagonal tubes securing the front of the rear keel.
-

- H-J bottom perimeter tubes in place. These 3 tubes were welded flat on the table then lifted into place. Here you see the bottom of the car start to curve upward to clear the diffuser.
-

- H-J side diagonals. Here we work our way from front to back to avoid cutting off the ends of the tubes to fit them in from the side.
-
- J left and right lower verticals
-

- J to L left and right lower diagonals
-

- Released from the chassis table again to weld the bottom of all the joints. It’s so much easier this way I don’t even try to weld upside-down anymore.
-

- J-K inner bottom diagonals hold the rear of the rear keel
-

- K-L diagonals secure the rear of the rear keel to the beltline. This is the back end of the frame.
-

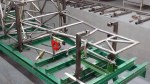
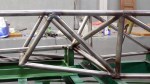
- Top frame rails from the main roll hoop to the back of the car are finally in place. Now we can see the complete outline of the frame.
-
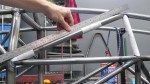
- G-H upper diagonals are curved outwards to allow us to remove the engine from the top. The curve must be in the correct plane.
-
- From this angle you can see the curve. Removing the engine from the top is a design change based on feedback from the ApexSpeed.com forum. Top rail will be made removable later.
-

- H bulkhead, upper left vertical. Note that it’s not really vertical, but leans forward and inward.
-

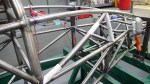
- Test fitting the G-J upper diagonals. Sometimes it’s necessary to fit a bunch of tubes before welding any in place.
-
- Now we start welding them in place from front to rear. These are the G-H upper diagonals.
-

- H, H-J, J upper tubes (6). Skipped a couple of photos…
-
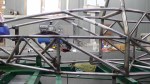
- It’s almost done. Just a few inner diagonals left.
-

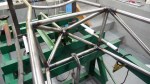
- J bulkhead, inner diagonal UL-LR. This area of the frame is extremely strong as it has to support the suspension rockers and engine mounts.
-
- J bulkhead inner diagonals, LL-UR, 2 pieces
-

- H-J inner diagonals support the rear engine mounts.
