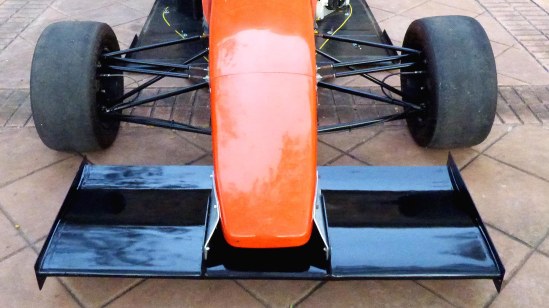
Building the Front Wing & Mounts

Front Wing

Finished front wing on the car (endplates to be added after setting ride height)

Part Eleventy-seven, In Which We Finally Lay Up a Body

Finished Body

Another view of finished main body.

Time to lay up the first set of body panels. In some photos you can see the joggles laid into the molds with duct tape so the panels will overlap smoothly. Nine coats of mold release wax and there were no problems releasing parts from the molds, although at times I did have to work a bit. Each mold required about a day of finishing work to remove ripples due to waviness in the body buck. As I’ve said before, don’t build a body buck the way I did it. Instead, immediately after completing the X-Y grid of cross sections, lay about 3mm of fiberglass on top to give a good solid surface, then use body putty on top of that. You’ll be finished in half the time it took me. The only place you should use foam is where actual carving is required due to the complexity of the shape, like the sidepod air inlets. Yes, I know the main roll hoop forward braces are still not there. Patience…

One problem I found out the hard way is that a chemical in some brands of duct tape inhibits gelcoat curing. In the end, gelcoat that had been in contact with some kinds of duct tape never fully cured and had to be cleaned out with acetone. Also, the joggles formed with duct tape were too sharp for the fiberglass mat to conform to, resulting in bubbles under the gelcoat that have to be scraped out and reworked. Gelcoat is probably more trouble than it’s worth given its weight, so next time I’ll just prime and paint the body panels to finish them. The sharp joggle corners need to be filled in with fiberglass roving before laying mat on top.

Last of the Molds

Mold Set

Completed set of molds

Since this is the last of the molds, in the photos below I’m showing each of the layups, for a total of three. Target thickness for the molds is 4.8mm, three times the expected thickness of the parts to be molded.

Fiberglass Mold Layup, Parts 4, 5, 6…

Probably the main thing to explain here is how I create the overlaps in the molds. The edge of a mold is marked on the body buck with duct tape, which will leave an impression in the mold for later trimming of the finished part. Then after removing the mold from the buck, I lay in a strip of 1″ duct tape touching the existing tape, then another strip touching that one. I then remove the first two strips of tape, leaving the edge for the next mold with a 1″ overlap.

Fiberglass Mold Making- Nose, Tail, Sidepod

Time to make molds!

Finishing the Body Master Pattern

I ended up applying ten coats of SikaFloor epoxy to try to build a hard base for further finishing. Even this gave me problems, though, as it appears that the two-part urethane foam continues to expand indefinitely. Every time I would finish a section, next time I looked at it, it needed more work. For a long time I just thought my eyes were getting more demanding, but I finally realized the body buck was slowly changing shape, bulging out between the ribs. Once I figured this out, I just tried to finish the molds as fast as possible. I also installed air conditioning in this part of the workshop, and kept it running at night to avoid temperature-cycling the pattern.

If you’re thinking of doing this yourself, a better way to do it would be to just fiberglass straight over the plywood forms, using tape or something to support the first layer of fiberglass while curing. About a 3mm fiberglass shell should do it. Then use body putty right over that, using standard auto-body finishing techniques. That way there’s no foam between the ribs to push outward and mess up the shape. The only time you need foam is when you’re really sculpting something, like the sidepod air intakes. Oh, by the way, plan on about 1,000 hours of work.

After the floor epoxy there were several rounds of primering, puttying and sanding, followed by two coats of black two-part epoxy paint. This was sanded with 400, 800, 1200, and 2000 grit wet-or-dry sandpaper, then machine-polished with rubbing compound. The top layer was 9 coats of “Hi Temp Mold Release”, applied by hand strictly according to the instructions.

When I started to think about how to split up the body panels, I realized that the “horse collar” head surround would be impossible to remove when the car was finished, as it would interfere with the main roll hoop. This necessitated going all the way back to the SCCA rule book, where I took another look at the minimum cockpit opening specifications. I found that I could meet the minimum cockpit opening size with a fixed head surround, but I had to cut the “arms” off it. So, you get to see that surgery in the photos below.

Building the Body Buck: Part 1, Ribs & Foam

Here’s what we’re building, sort of. Rather than build a CAD model of an actual assembly of stringer and rib parts, I extruded cuts into the solid model so that the slots will appear in the correct places when I make cross-section drawings at the appropriate locations. This is actually harder to visualize than you might think. I wasn’t sure it would go together flawlessly, especially since the cuts in both the ribs and stringers went to two different depths depending on the typical height of each region. I didn’t want long floppy sticking up from the cuts:

Body Buck CAD

Original 3D CAD model showing slots for assembling plywood ribs and stringers.

Test Project: Children’s Slide

Frame for slide

Slide frame welded from bent tubing

Wire Support

Chicken wire was welded to the frame and bent into position to hold the fiberglass in place while the resin cures.

Fiberglass Cloth

Fiberglass cloth is cut to size and laid in place.

Resin Applied

Polyester resin is applied

Slide Bottom

Resin cured too fast due to a) no data sheet b) language barrier and c) confused salespeople

Bottom Fiberglassed

After attempting to smooth out the bottom with body putty, I ended up fiberglassing it in for appearance and safety

Slide Puttied

The top of the slide after several layers of 2-part body putty and red glazing putty, sanded and ready for primer.

Primer Applied

Primer applied with spray gun

Bottom Painted

2-part epoxy top coat sprayed on bottom of slide

Top Painted

2-part epoxy sprayed on top. I love this paint (Jotun Penguard Enamel).

Top Close-up

Close-up of finished topcoat, Jotun Penguard Enamel, sapphire blue, 2-part epoxy